Setting Up a Testing Project in Protractor with Cucumber and Page Object Model – Grape Up

For many years, when it came to automating web UI testing, Selenium was the king. And it is safe to say it still is! As a widely known and proven automation testing tool, it is often a default choice for many software projects. But does it mean one shouldn’t explore other technologies and frameworks? Of course not! In this article, I will discuss the main points behind utilizing Protractor and explain how to set it up for seamless use with Cucumber and Page Object Model.
The main point behind using Protractor is that it was developed mainly for testing Angular applications. Since Angular has its own individual properties – methods, features, and synchronization, Protractor addresses those to make testing such apps easier and more reliable. It is worth mentioning that Protractor is a wrapper over webdriver.js – the official JavaScript implementation of Selenium Webdriver. What this means is that during tests development particular Angular elements can be reached with out-of-the-box test framework methods and it still looks similar to what would have been coded in a typical Selenium project. On top of that, Protractor is capable of synchronizing with Angular, which also helps with the stability of the tests.
The assumptions for setting up the project were similar to previous endeavors with test automation projects – the structure has to be clear (Page Object Model) and test scripts have to be clear and understandable, even for non-technical team members (Cucumber and Gherkin). The choice of programming language fell on JavaScript since Protractor is a node.js application and the other viable option, TypeScript, would require a bit more coding. This time the project will utilize Visual Studio Code as IDE.
To begin setting up the project, first, you’ll need to install node.js. After installing it on your machine, you can verify that the installation was successful by typing in ‘node -v’ in the terminal. While you’re at it, in the same place you can also verify the Node Packages Manager, typing in ‘npm – v’. Then, type in ‘npm install -g protractor’ and verify its successful installation with ‘protractor –version’. Just in case, you can update the driver from time to time by using the “web driver-manager update” command.
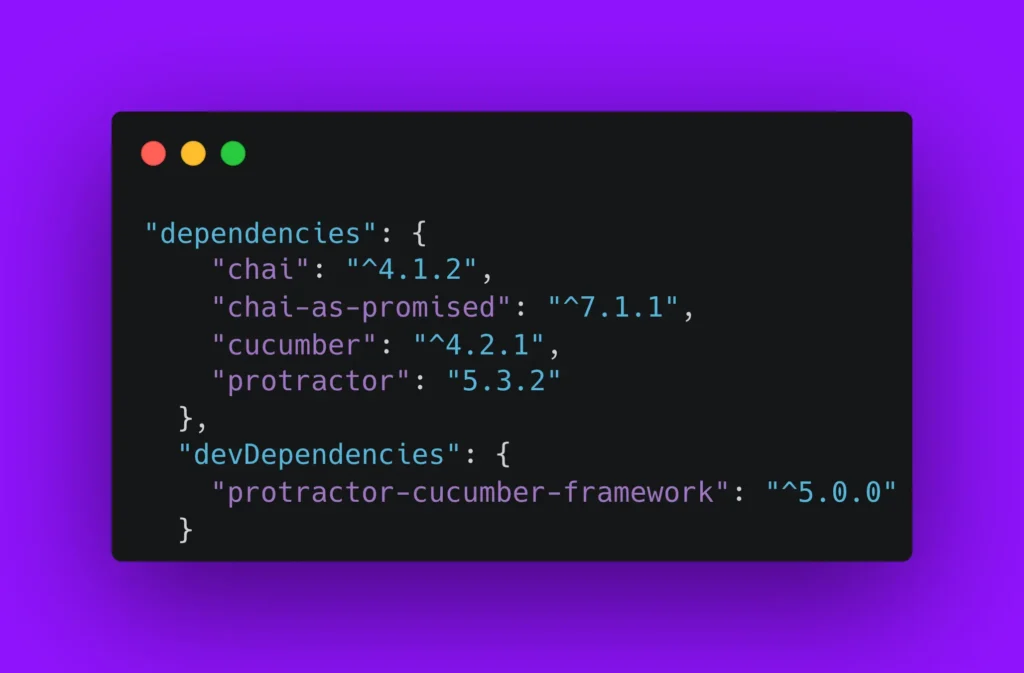
Our next step will be setting up the IDE for comfortable work. First, in Visual Studio Code install the “Cucumber (Gherkin) full support” extension. Once that’s done, we have to take care of our dependencies. In our project’s package.json file we’ll need to include chai and chai-as-promised for assertions, cucumber, and protractor – all in the dependencies section. In devDependencies, we’ll need protractor-cucumber-framework to achieve the goal we’re striving for.

To have comfort and clarity within the development process, one of the features that provide it is the ability to quickly look up what code is executed behind each gherkin step. To achieve that in a Protractor project, we’ll need to specify Cucumber options in the conf.js file. What is necessary is the path to the steps folder.

Then, in the settings.json file, we’ll need to specify the paths to folders containing step definitions and methods that are executed behind them. We can do this in the following manner:

When we do this, we can easily navigate through the project by clicking the step/definition/method/element specified in the code with a CTRL or CMD button pressed. It’s a simple thing, but it can dramatically boost productivity and decrease the time spent on developing or debugging tests!
Our next premise that we need to tackle is running the tests by tags. While adding a tag to a feature file is pretty straightforward, the part where these are run requires providing a path to Cucumber Feature files in the conf.js file.

As you can observe in the above piece of code, the cucumberOpts section in the conf.js file requires a variable named ‘tags’ as an empty list.
While we’re at it, it is important to point out that the conf.js file needs to have a section where we specify the Cucumber as our testing framework:

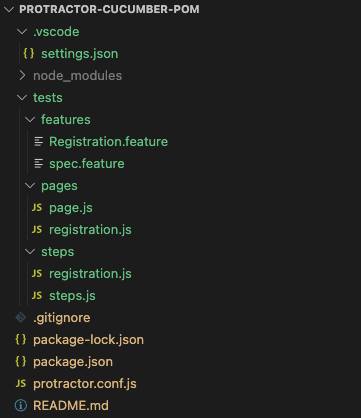
The overall structure of the automated testing project created in Page Object Model is similar across technologies. An overview for Protractor can be observed below:

Once you create all the necessary files and finish the configuration, it is time to write the tests themselves.
Since we’re working in BDD framework, let’s start with a simple Feature File with a simple scenario focusing on verifying a Registration form (with a tag for running it later)

Once that’s done, we can specify what happens in each step in /steps/registration.js:

In that file, we first specify the path to the file containing methods that are going to be called in each of the step definitions. Then we’re calling assertion libraries and setting up timeouts.
Step definition implementation is pretty straightforward; the Cucumber keyword precedes a regex and a parameter; the body of a step calls a method from /pages/registration.js file. Usually, one step calls for just one method but test steps could be more intricate if need be. Notice that if a method returns a Boolean value, we are invoking assertion at the level of a step definition (line 23).
In the/pages/registration.js file, we need to specify a locator dictionary for elements that we’re going to interact with. You can do this in the following manner:

Please note the selectors used for locating the elements; you can use various out-of-the-box methods for locating elements in Protractor, which have been extensively described in the official Protractor Guide (link)
The same goes for methods used to interact with elements:

(PS. Do not store your login credentials in the test automation code… The above is just for demonstration purposes)
What happens above is that we’re implementing methods that we’ve called in /steps/registration.js file, using the elements we’ve put in the locator dictionary (highlighted in light blue) and interacting with them using Protractor methods (highlighted in purple).
Then it is time to run the tests. In VS Code, open a new terminal window and hit the “web driver-manager start” command. Webdriver should be up and running now.
To run the test you’ve written and tagged accordingly, all you need to do now is you have to open another new terminal window in VS Code and enter the command:
protractor protractor.conf.js –cucumberOpts.tags=’@smoke1′ – tagging the desired feature accordingly.
And there you have it! Now you have a ready, set up Protractor testing framework integrated with Cucumber, Page Object Model which you can run with the help of tags. If you want to find out more about Protractor, I encourage you to go to the Protractor website, which contains comprehensive documentation with code examples here.


